The Cooling Fan and 12V/9V Electrical System for my XT10i
My Orion XT10i is equipped with a 12V fan and an Intellescope object locator that require electrical power. I started with the Cooling Fan kit supplied by Orion for their Newtonian telescopes. Orion intended the fan to be rigidly mounted to the primary mirror holder, but after reading an article in Sky&Telescope, I decided to try a more flexible mount so that the fan could be used continuously during viewing as well as for the initial cool-down period.
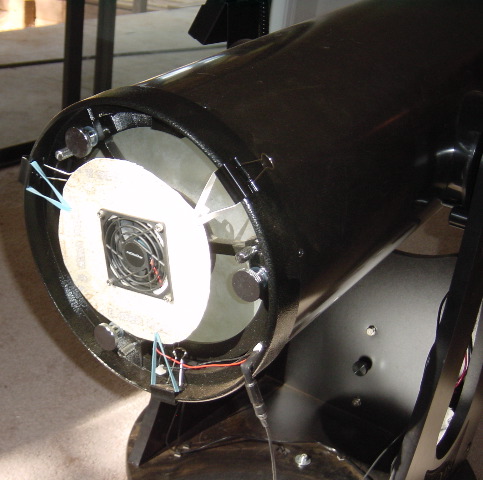 So I cut an old
piece of linoleum to the size recommended in the article, (actually the size
of the closest round object I could find to use as a guide for cutting with
a utility knife). I then cut a center hole for the fan and a few mounting holes
for the screws that attach the finger guard. The linoleum is then placed between
the fan and the finger guard and the screws tightened. I then poked three holes
evenly spaced around the edge of the linoleum and poked the ends of three rubber
bands through. On the telescope I placed 3 document clips and ran the rubber
bands through them. Total project – about 15 minutes.
This fan mounting system seems to work well, no transmitted vibrations and efficient cooling, and allows the telescope to be pointed vertical without interference. (Make sure you don’t put a document clip right in the middle of the side of the tube of touches the vertical stop, or you will mess up the Intellescope alignment procedure.)
The Orion fan system came with a battery pack that uses 8 D cells. Since I use the fan continuously during viewing, I knew the batteries would not last forever, and indeed that was the case. Replacing 8 D cells was going to be expensive. (Well mayby be not compared to my Naglers,;-)) I had also needed to replace the Intellescope’s 9V battery as well during this period. It was time to switch to a rechargeable battery system for my XT10i.
Fortunately batteryspace.com has a good selection of rechargeable NiMH batteries. NiMH are good as they have no “memory” and can be recharged often, the specs say up to 500 times. They are also much lighter than lead acid battery systems of the same capacity.
I ended up buying a 12V 4 Amp Hour (“AH”) NiMH battery pack for about $30. I could have bought 2 12V 1.8 AH packs for about half that price, but I wanted the extra AH and didn’t want to put 2 packs in parallel. If you buy either of these packs, make sure you also order the matching female connector. I didn’t and had to improvise. I also bought their Smart Charger, and recommend it as well.
Since the Orion fan draws 170 mA, the 4 AH battery pack should last for several viewing sessions without needed to be recharged.
To make 9V for the Intellescope object locator, one needs a 9V voltage regulator capable of supplying 100 mA. Since this will be used with a battery powered system you will want to chose a regulator with a low quiescent current and a low dropout voltage.
The local Fry’s had the NTE 1902 on the shelf and that is what I am currently using. The NTE 1902 is a 3 terminal 9V 100 mA Positive Voltage Regulator. It has the added advantage of not needing any other external components.
One needs two sets of two wires going to the voltage regulator, one from the battery in parallel to the set of wires going to the fan, the other 9V set going to the Intellescope. On the other end of the 9V wire you will need a 9V battery plug, available at RadioShack. When replacing a battery, wire the positive wire to the smaller terminal.
What is required to use the voltage regulator is to hook up the negative wires from both 12V and 9V sets to the middle leg of the device (ground), the positive 12V wire to the right leg, and the positive 9V wire to the left leg, (assuming the flat side is facing you).
It’s that simple.
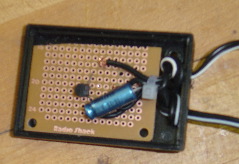 To assure a mechanically
stable device, I put mine inside a small plastic box, and on a small piece of
perf board that I cut off from a larger one I had lying around. Since I also
had a capacitor looking for something to do, I added that across the 9V output,
although the specs suggest that it was not necessary.
Note that this assembly does not require a printed circuit board, just a few
holes through a piece of plastic or whatever, to stick through the wires and
the pins (legs) on the 1902. On the back side, bend the pins and wires to touch
where appropriate, and solder them together. Total project – less than
20 minutes, once you have the bits you need, of course.

The picture above shows all the pieces. The largest item is the original Orion D-cell battery pack. The smaller NiMH rechargeable pack is next to it. The small box with the voltage regulator is also shown with the various wires.
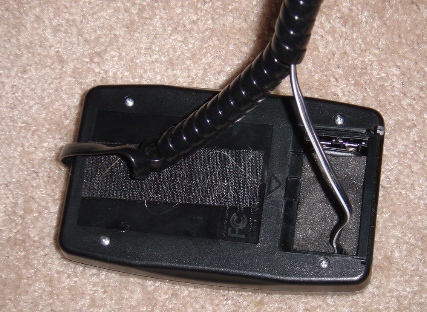
To now use this setup to replace the battery in the Intellescope Object locator, I placed the 9V battery connector so that the terminals would have the same sense as the battery I was replacing, i.e. smaller male fitting on the left, and then wedged it in place with a bit of foam left over from an eyepiece storage case.
 I
then drilled a small hole near the edge of the battery cover and snapped it
in place. As you can also see, I ran 9V wire inside the normal coiled wire going
from the base to the controller.
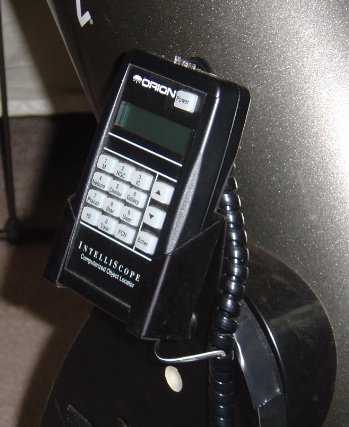 I
pretty much always keep the Intellescope in its holster, so this setup works
well for me.
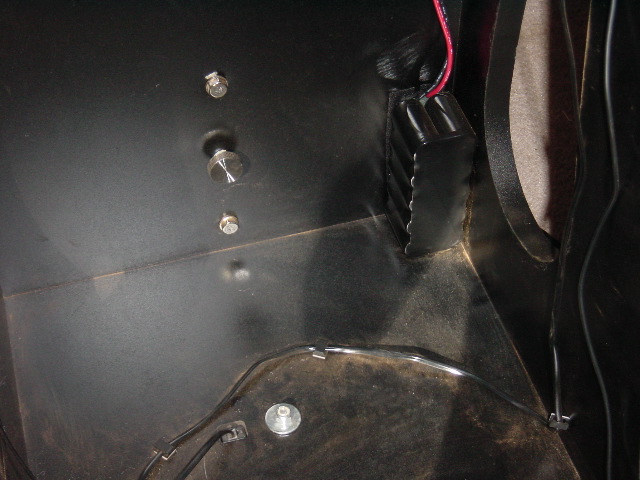
The 12V NiMH pack is small enough to be attached (Velcro) the corner of my base and still allow the OTA to reach vertical without interference. I keep it attached to the base and charge it in place.
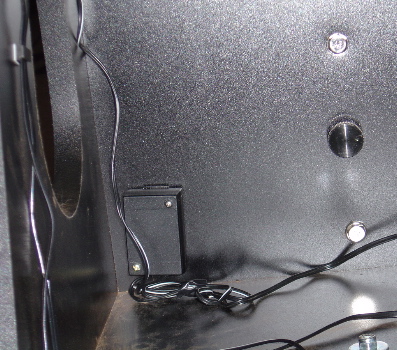
The picture on the right shows the system with the 9V converter added.
It is very nice to have one less thing to carry or setup, as all I have to do at my observing site, once the OTA is on the base, is plug in one connector and the fan and Intellescope are running and/or ready to go.
Visit my Astronomy page for other articles.

