SMART III - Video Calibration Toolkit
Steve Smallcombe's SMARTAVTWEAKS site

"Dummies" guide to SMART
This guide which explains the SMART process in layman’s terms. was generated by Jeff Orwick and myself in response to the need for a "Dummies" guide to SMART. This material is also available as a pdf file. To request a pdf file, e-mail me at steve@smartavtweaks.com, and I'll be glad to send it to you.
However, if knowing the intricacies of why SMART works isn’t on the top of your list of priorities and actually getting on with the calibration is, then you should move on the other sections of this web-site.
Color
Mixing and Ratios
Say you are having another couple, Harry and Sally, over to watch a movie
in your fantastic new Home Theater. You go over to your bar and pour yourself
a White Russian, (for those who don’t know, a White Russian is an
alcoholic beverage consisting of one part Vodka, One Part Cream and One
Part Kailua). You offer your friends a drink and, eying your white Russian,
they say they would both like one. Harry says he would like a big one,
but Sally only wants a little bit, and since Harry has never been one
to share, you decide to make Sally a tiny-tiny white Russian in a shot
glass. So, as you are mixing you tell them that this is JUST like calibrating
your new projector. They look at you funny, and wonder what piece of techno-babble
you are going to spout next….
The SMART process is just like mixing drinks. Your projector mixes colors,
instead of liquids, in the proper proportions to produce what is called
a White Russian… No wait, I mean a D65 6500 Kelvin NTSC picture.
The Projector mixes your visual color drink with combinations of Red,
Blue and Green in the proper ratios to produce a visual “White Russian”.
Like you, your projector can make “White Russians” in different
sizes depending on what your DVD player ordered. A Small “white
Russian” like Sally’s has only a little bit of Red, Blue and
Green in it, so when mixed together and poured on the screen the picture
is black. A medium size one like yours has more of each color, so the
picture is Gray. A large one like Harry’s (Don’t worry, Sally
will drive him home) has just about as much red, green and blue as can
be thrown on the screen, and so the picture looks White.
When you serve your friends their drinks, they are all drinking the same
concoction – 1 part vodka, 1 part Kailua, and one part cream. It
doesn’t matter what size they are—they all taste the same.
It is the same way with your projector, no matter what size it makes,
it will still mix 1 part blue, with one part red, with one part green
– if it’s doing its job right.
Now some might want their drinks a little sweeter (more Kailua), or with
a little more cream or with a little more bite (vodka). Color Temperature
is a personal taste thing, and folks in Japan tend to use the “high”
setting because they prefer more blue in their picture. Many people do
not have their sets calibrated and will adjust their television’s
controls until the “picture looks right” -- based on their
personal preferences. Just like the recipe for a White Russian can also
change from locale to locale. So why should I prefer the D65 Color Temperature
(flavor)? Because that is what the technician doing your film transfers
was drinking… If you want to see the movie as that technician thought
you should, (who in theory is trying to preserve what the Movie Director
wanted you to see), then you need a display that will show the movie just
as transfer technician saw it while transferring it. He watched a D65
picture, so in theory, so should you.
Your projector’s low setting was “mixed” at the factory
using the proportions for the D65 flavor of color. However, the factory
probably did not ensure that your projector is really making the smallest
and the largest White Russians possible.
SMART has Three Main goals:
1) Make sure your Projector makes White Russians in the right proportions
at all sizes
2) To set your projector so that it can make the biggest video White Russian
possible (brightest white)
3) To set up your projector to make the smallest possible video White
Russian possible (darkest black)
The difference between the very Largest White Russian your Projector can
make (brightest screen) and the Smallest White Russian it can make (darkest
screen) is called Contrast. When a projector has more contrast, it has
more of a choice of what size “White Russians” it can make
and therefore the picture will look more Dynamic (more variation).
So far we have talked about mixing drinks of different sizes by combining
the ingredients in an exact 1:1:1 proportions. We are using this analogy
to understand how light, that you might say comes in Red Green and Blue
bottles, can be mixed to produce black and white and all the shades of
gray in between, as well as, yellow, orange, light blue, pink, etc. It's
easy for a projector to make Red, just pour out of the Red bottle, just
like anybody can make a drink that is pure vodka. Its getting the flavor
right when things have to be blended or mixed that is difficult as now
the exact proportions clearly influence the taste. It turns out that once
your projector learns how to make white as an equal 1:1:1 mix, that the
other colors will be right too. Gray is just white in smaller glasses
and the goal of projector calibration is to get the right flavor of white
no matter how big or small the glass. In projector talk the process is
called gray scale linearity or grayscale tracking, but thinking about
mixed drinks in different sized glasses is much easier.
Unfortunately for us, the job of setting up to accurately mix color cocktails
in the projector is a little more difficult than what goes on at your
local pub. For one thing, Colors are a difficult thing to measure. You
can’t just nip round your local grocery and pick up a couple of
measuring cups to find out how much color you’ve got spilling onto
your screen.
Before SMART, the only way to get an accurate calibration was to hire
an ISF Certified technician to come to your house with a device that has
be “calibrated” against a standard reference light source.
However, due to the cost of these devices, most of us want a little cheaper
solution.
This is where our light meter and RGB filters come in. It will measure
the amount of light incident upon the screen. To measure the intensity
of different colors, we simply have to put the appropriate colored filter
in front of the light meter. This will prevent the other colors from reaching
the light meter and registering in the measurement.
Sadly, the light meter can’t be simply used to measure equal parts
of Red, Blue and Green. This is because the light meter is more sensitive
at certain wavelengths (colors) and less sensitive at others. This means
when I measure a “White Russian” light source, with equal
parts red, green and blue, my detector won’t read the same for all
of them. It might read 40 lux for Blue, 37 lux for Red and 60 lux for
green – even though we KNOW that are all displayed in EQUAL parts!
If we transfer this back to our “drinks” example, this presents
us with a situation where we effectively have 3 graduated cylinders (remember
chemistry class?) of different diameters with a scale that runs up the
side of each. There is one graduated cylinder for each color that can
ONLY be used with that color. (Pretend they blow up or something if you
try pouring blue light into the red cylinder)
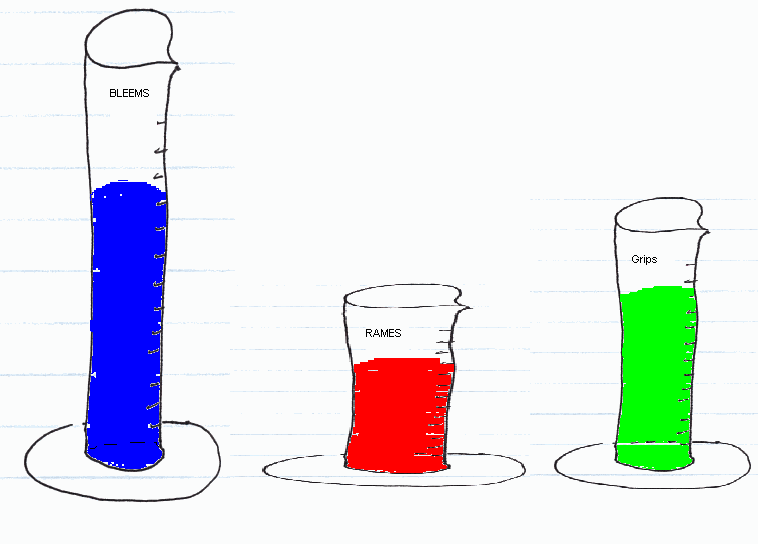
Because they have different diameters, when I pour colors into them, they
will rise to different levels, and therefore give different readings when
we look at the graduated scale on the sides. The Scale on the side of
our Blue cylinder says it’s measured in “BlueLux”, the
red in “RedLux” and the Green in “GreenLux”.
So in order to mix a new perfect White Russian for our projector, we need
to know how many “RedLux” are equivalent to a “GreenLux”,
how many “GreenLux's" are equivalent to a “BlueLux”
and how many “BlueLux” are equivalent to a “RedLux”,
etc.
There are several ways to establish this calibration. If your projector
comes with a “known well calibrated” color temperature, as
is the case with the SONY 10 HT and 11HT’s low setting, we can use
that color temperature in a calibration run. In this case we can pretend
that our projector manufacturer sold us a pre-mixed White Russian cocktail
with our projector – our projector’s low setting. And luckily,
unlike a REAL White Russian, our colorized version is a LOT easier to
break back into its former parts – we just place our colored filters
in front of the light meter.
If we “fill up” each of the graduated cylinder’s using
our pre-mixed White Russian (Low setting on the SONY) we can see we have
50 “BlueLux” of blue, 20 “RedLux” of red and 30
“GreenLux” of green.
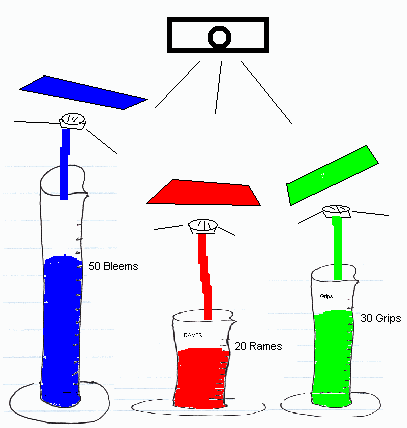
Since we know the light coming from the projector is in equal "parts"
we therefore know that 1 "part" = 50 "bleems" = 20
"rames" = 30 "grips".
Since we know the light coming from the projector is in equal “parts”
we therefore know that 1 “part” = 50 “BlueLux”
= 20 “RedLux” = 30 “GreenLux”.
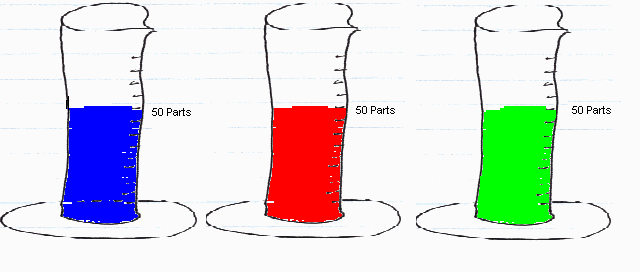
With this information we have now “calibrated” our test apparatus
(the light meter and the RGB filters). As a result of the calibration
process, the SMART III spreadsheet will mathematically make 3 new graduated
cylinders of EQUAL diameter, marked with the same scale and measured in
“parts” to pour your measurements into. Because these new
cylinders all have equal diameters and the same scale, if you pour a properly
mixed “white Russian” into them, the colors will all rise
to the same level. All you have to do to make sure you are mixing equal
parts is make sure the amount in each cylinder is the same!
For most projectors however, including SONY projectors that have been used for a few months, or more and the bulb has aged, there is not a good reference for use in calibrating the test apparatus. Fortunately with SMART III, the quality of the light meter and filters are such that the “default” values supplied in the spreadsheet will serve as an accurate calibration. These “default” calibration values were obtained by measuring a variety of light sources and projectors, including ones that had been calibrated using professional equipment. Thus with SMART III a “calibration” run is not really required unless one is sure of the quality of the factory color temperature. SMART III is pre-calibrated!
Measurement and Gain Adjustment
By changing the Gain in our projectors, we can change the amount of Red
, Green and blue reaching the screen, and consequently the number of “RedLux”,
“GreenLux” and “BlueLux” we measured and then
converted to “parts” by SMART. When the projector mixes your
drink, it pours equal amounts from each bottle of blue, green and red.
The liquids pour from the bottle at different rates depending on how far
over you tip the bottle while pouring. If your projector tips the bottle
only a little bit, just a trickle goes into the glass. By tipping them
a lot, a huge amount goes into the glass. You should think of Gain as
determining the angle at which the projector holds the bottles while pouring
the drinks, allowing it to pour more or less of a certain color in a given
period of time. More gain for a particular color, means more of that color,
less gain means less color.
How big of a “white Russian” we can make depends on the maximum
amount of color that our particular projector can pour. For example, on
the Sony VPL-VW10HT, the UHP bulb does not produce as much red as it does
green and blue. Therefore, it can “pour” only so much red.
Since we must keep the proportions the same, Red will limit how much Green
or Blue you can add. In order to make the biggest White Russian you can
make, you Max out the amount of Red you have and add blue and green to
get the proper proportions.
Just as there is a limit to how big you can make your White Russian there
is also a LIMIT to how SMALL you can make a “white Russian”.
The difference between the smallest size and the largest size determines
the projector’s contrast.
Most projectors (except CRT based ones) have difficulty in cutting off
the light from the bulb completely. Because of this, some light spills
onto the screen even during absolutely black scenes. You still want this
miniscule amount of light to be mixed in the same proportions as your
“Biggest” white Russian. Otherwise the “black”
that the projector produces will have “color cast” to it,
and the black will appear slightly green, blue, red or any other color
depending on how much the proportions are off. Most people also care how
dark, the "black" of projector appears, especially with LCD
projectors where the "black level" can be an issue. Fortunately
the techniques described here will help improve the black level as well,
but that's another subject.
Proper color balance is important across the entire spectrum from small
to big, but especially at the highest light levels as the human eye is
far more sensitive to colors at high light intensity levels. Your projector
can output anything from a really, teeny, tiny white Russian in a Thimble,
to a Huge one in a 5 gallon bucket. You must ensure it is capable of mixing
each size in just the right proportions or the “flavor” will
be wrong at that size. The Idea of gain adjustment is to make sure that,
ideally, ALL of the “white Russians” your projector produces,
from the smallest to the biggest, are mixed in the right proportions,
and therefore have the right flavor of D65.
To see if your projector is doing this, we will sample the output from
the projector at different sizes. These sizes will be measured in IRE.
The Smallest size will be called 0 IRE and represents the black end of
the scale. The Biggest size will be called 100 IRE and will represent
the brightest while we can make. We can picture different sizes of glasses
representing the different IRE levels, with all glasses ideally having
the same flavor. The smaller glasses appear darker because there is less
of our "white" Russian.
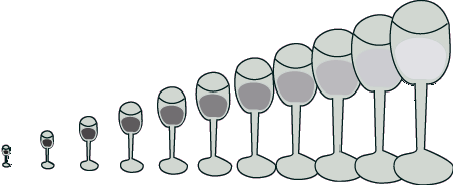
IRE 0 to 100
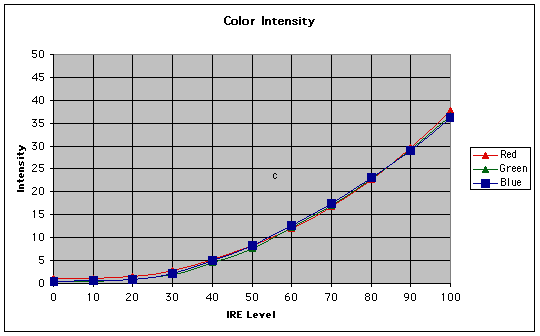
In practice, we will “order up” these sizes using special video signals encoded on the AVIA DVD. We will then fill our light meter’s “graduated cylinders” from each size and feed that information into the Spreadsheet. The Spreadsheet will display our results at each size as “parts” in a graph called “Color Intensity”. All you have to do is make sure that each color has the same number of “parts” at each level. An ideal response will yield three identical lines, red, green and blue, all very close in value. This means our projector is mixing our “white Russians” correctly across the entire size range. An example of this is shown in the chart below
You might ask, if gain controls the proportion of color at all IRE levels,
why do I need to make a whole series of measurements, wouldn't just one
do? The answer is that if things were adjusted perfectly, that's all that
would be needed, but there are several things that can go wrong and seeing
that the light output for the three colors "track" each other
properly is one important test of the projector's overall state of calibration.
You might also notice that this curve is not a straight line because it
corresponds to a “Gamma” curve of 2.5.
The curve is there because of the way real video signals “order
up” different size ”White Russians” for CRT displays.
Suffice it to say, that as long as your curves correspond to a 2.5 gamma
curve such as this one, the right sizes are being “ordered up”.
Another view of the SAME information is obtained by looking at the ratio
of the parts to one another. Since we should have 1 part red, one part
green and one part blue. They are in a ratio of 1:1:1. So the relation
of any color to any other color is always 1:1. The graph called “color
balance” shows the relationship between the colors. This graph is
particularly useful for looking at how your “smaller” White
Russians are working out.
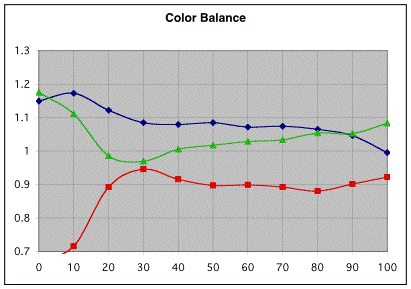
As you can see in the above example from an untweaked PLV-70, the values
are close to 1 between IRE 50 and IRE 80, but IRE 20 and IRE 100 are a
bit off – quite a bit at IRE 0. In an ideal response , all three
lines would be near 1 at all values of IRE.
Gain and Contrast
To make the biggest White Russian possible, you need the projector to
tip those bottles over as far as possible to get the largest flow, and
therefore the largest amount of liquid going into the glass. As we saw
above, Gain tells the projector how far to tip the Red, Green and Blue
bottles when mixing a drink, to get the right amounts into the glass,
but the projector only has a certain amount of time to make each drink.
To get the brightest picture possible you by raise the gains to as high
a level as possible. This will make the difference between the brightest
picture and the darkest picture even bigger, and therefore improve the
projectors contrast.
Once the color balance is established using the gain settings, it is handy
to also have a control that affects the overall level at which the projector
produces color, but in this case, for a three colors at once. This is
the user level control called “Contrast”. Another name for
the user control “contrast” is “White Level”.
We will use “White Level” to refer to this control to distinguish
it from the concept of contrast – the difference between the brightest
and darkest screen. When you raise the White Level, you are asking for
the projector to tip ALL the bottles a little further, but to do it maintaining
the proper proportions of 1:1:1. So when White Level is raised, the projector
will tip the bottles more, more liquid will come out and the resultant
White Russian will be larger.
The gain settings and contrast are obviously highly interactive. If the
combination of gains and contrast call for pouring more of any given color
than the projector can handle, then the color balance (flavor) will be
off with the larger glasses or higher IRE levels. Essentially when this
happens, one of the bottles the Projector is using to pour the White Russian
becomes empty, while the other two bottles continue to flow.
One of the reasons that we run a series of IRE levels is that it allows
SMART to detect whether one of the bottles is running empty. When it finds
this condition, the best bet is to turn down the contrast, and not the
gain for that color as that would also affect the color balance or flavor.
(In practice it is necessary to adjust Contrast for different source components
as their signal output voltages can vary and one needs to fine-tune the
drive levels of the projector without messing up the color balance. This
is the job of the Contrast control.)
Brightness
and Bias Adjustment
Ok, we have learned that gains and contrast settings control the level
at which the projector pours colors as a function of the input signal
or IRE level. Unfortunately, that's not the whole story. The problem is
that liquids don't start pouring from the bottle until they have been
tipped to a certain angle where the liquid just begins to flow out.
This is the overall job of the “brightness” setting, and,
for the individual colors, the bias settings. Brightness can also be referred
to as “Black level”. You might say that the brightness setting
tells the projector how far to tip the whole bottle rack before one can
expect to get things started pouring. The Bias settings allow us to fine
tune things for each color so that all of the bottles start pouring at
the same time. Properly adjusted, this represents the minimum amount of
blue, red or green that the projector can pour. Getting the bias and brightness
levels right is therefore the key to a good black level and is how we
get rid of any tendency for the black levels to appear colored or tinged
with color.
If we set a bias point too low, no liquid will flow from the bottle into
the glass, because the bottle hasn’t been tipped over far enough
to begin the flow. So, in effect, if all of our bias points or brightness
settings are too low, the projector starts serving up empty glasses, as
the projector never tipped any of the Red, Green or Blue bottles enough
to put any color in the glass at low input levels. An Empty glass basically
represents the deepest black possible. Which is fine if we asked him for
IRE 0. However, if we ask him for IRE 20 and he pours us an empty glass,
that means the projector is displaying the same color black as he did
at IRE 10 and IRE 0. We have lost all of that shadow detail!
Eventually, as we ask the Projector-Bartender for bigger and bigger drinks,
he will tip the bottles more and more, until finally the glasses start
to fill up. But until that point is reached, a lot of signal information
is being lost in the black.
If we do just the opposite, and set bias points or brightness too high,
the projector will be pouring more into the glasses earlier. SO if we
ask him for a 0 IRE White Russian, he will in fact make a White Russian
that is bigger than the smallest one he could make if he just lets the
colors trickle out. The more he pours in, the brighter the color of black
at IRE 0 and the worse the "black level".
The Size of the biggest White Russian we can make (the brightest image)
hasn’t changed, so in effect the difference in size between the
0 IRE White Russian and the 100 IRE White Russian was reduced and we lost
contrast!
This is why it is very important to have Bias levels set correctly. We
do this simply by using our Light meter and measuring when our light output
begins to change. First we lower our bias settings to 0 and then order
a 0 IRE "black" Russian. Then using our colored filters we watch
the measured light level for any change. The first sign of change means
that liquid has just begun to trickle from the bottle into our glass.
That is our bias point for that color, and also corresponds to the smallest
amount of light we can produce for that color. In projector talk, this
process is called determining the black point.Ideally, there would be
NO light at IRE 0. Unfortunately, due to the way LCDs work, there is always
a certain amount of “spillage”, where light leaks around the
“closed” LCD panel. It is as if, when starting to mix the
drinks, there is already a little bit of “White Russian” that
has already leaked into the glasses. This little bit of "leakage"
represents the smallest White Russian the projector can make, and therefore
the deepest black it can produce.
There is one complication here that needs mentioning. For every value
of brightness, there will be different set of bias values necessary to
determine the black point. Ideally it shouldn't matter what brightness
value one uses in setting up the bias values. In practice, however, experience
has shown that higher brightness values, with correspondingly lower bias
values produce a somewhat better black level.
Different Sources
Different sources use different electronics to produce the video signal
that is sent to your projector. These differences may result in slight
variation in the signals sent. Your VCR, your Satellite Receiver, your
old Interlaced DVD player, and your new Progressive one, may all mean
something slightly different when they order up a small or a large “White
Russian” For example, when your VCR comes up to the bar and asks
for a “small”, she holds her fingers so far apart to indicate
that to your projector bartender. The Satellite receiver comes up and
asks for the same thing, but he has bigger hands so his fingers are held
a little further apart. They both want the same thing, a small white Russian.
The same sort of thing can happen when ordering a “big” White
Russian – their outstretched arms are simply not the same length.
The Brightness and Contrast controls allow you to tell your projector
what each customer means when they order a drink – ensuring that
the projector-bartender will always server up the correct thing, regardless
of who ordered it.
This means you can use the same color temperature for all components (This
may either be one of the factory standard color temperatures, or ideally
one determined using SMART. ) – all you have to do is change the
Contrast/brightness settings.
AVIA comes with a nice, easy to use test patterns for setting the proper
black and white levels. Unfortunately for other components, such as your
source of TV programming, you will have to set brightness and contrast
essentially by eye, using black in scenes and comparing it to black bars
around the image. (Luckily you can produce black bars for most sources
by simply changing the aspect ratio.)
There is an added complication with brightness in that there are two fairly
different standards on how DVD players, and other components make black.
Progressive Players want to produce their blacks at 0 IRE, where most
interlace sources (VCRs etc) want to use 7.5 IRE. So when a Progressive
player wants to produce your darkest black, it sends a signal asking for
0 IRE. When your interlaced DVD asks for it, it sends a signal asking
for 7.5 IRE. By setting brightness differently for these two sources,
you can appease both, and always produce the darkest black available.
Color Correction Filters
Remember how we said that the projectors black level was limited by light
leakage? We lied. It turns out that there is a fairly simple way of reducing
the leakage that is limiting our projectors black level - we just need
to spill or waste some of the liquid going into the glasses. But we want
to do this selectively and only waste some of the ingredients. We certainly
don't want to waste any of the Red, as pouring Red is already the limiting
factor at the higher IRE levels. But we can afford to waste some Green
and Blue as their bottles have more volume in them than the Red bottle
has . Before, we just turned down the Green and Blue gains in order to
stay in balance with Red. So if we could find a way of wasting or spilling
Green and Blue without wasting any Red, then we can pour more green and
blue out to compensate for the waste and keep the right proportions or
flavor. In this scheme, most all of the glasses will still be filled to
exactly the same level with exactly the right flavor. We are just wasting
some ingredients we had more of than we could previously use.
So how in reality can we preferentially loose some of the Green and Blue
light, including the leakage light? The answer is a Color Correcting Filter
placed in front of the projector lens!
Just as our RGB filters remove colors from our White Russian so we can
measure them, a Color correction filter will do the same thing, but it
won’t do it as completely.
In theory, the RGB filters remove all light but red, all light but green,
and all light but blue from getting to the detector. For example, when
we use the blue filter, ideally NO red light and NO green light gets to
the detector.
A Color Correction filter is different in that it allows SOME of the other
colors through.
So if I filter my White Russian D65 drink through a CC filter, it may
remove some of the Vodka and Kailua and leave the Cream unchanged. My
drink just got creamier. The flavor changed! But we don’t want a
flavor change, what we want is a smaller D65 White Russian!
So what we do is adjust the projector so that it outputs a different flavor
than D65, and then strain it through a CC filter to produce D65 .
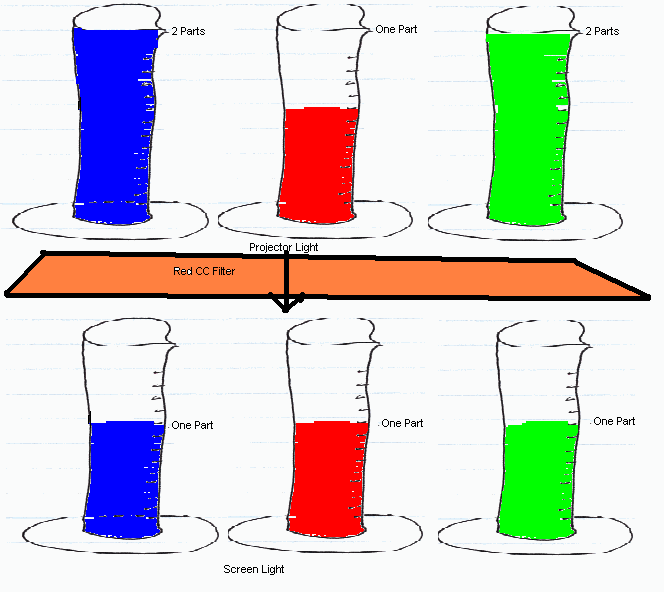
What happens when I try to make the Biggest White Russian using a CC filter?
Say we use a CC filter that removes 50% of the Green and 50% of the Blue
from the projector's output. And let's say we want to make an IRE 100
white Russian. Red, which was our weakest output, produces say 100 part
maximum at IRE 100. This means, with the filter off, the projector needs
to output 100 parts of green and 100 parts of blue to produce a D65 flavor
of white Russian on the screen. With the 50% filter on, the projector
still produces 100 parts of Red because the ideal CC filter leaves red
alone. However, the projector now needs to produce 200 parts of blue and
200 parts of green so that after the filter, the flavor or color balance
is right. Luckily, the Lamp in the VPL-VW10HT produces way more Blue and
Green than red, so we simply adjust the gain so it produces these amounts.
So what have we accomplished by wasting some of the Green and Blue if
we haven't changed color balance and most of the glasses are filled to
exactly the same level with the same flavor white Russian? Let’s
look in the very smallest glass…. normally it has just that amount
of liquid that “leaked” around the LCD panels. But by adding
a CC filter, 50% of the green and 50% of the blue leakage will be removed!
There is actually less liquid in the smallest glass because we have managed
to spill or waste the leakage colors! We now can produce a very small
white Russian, which in projector talk is a significantly darker black
level.
OK, if you have been following this carefully, you might be saying to
yourself, "Wait a minute, we just removed some of the leakage from
the Green and Blue bottles, but we still have all of the leakage from
the Red bottle reaching the glasses. Doesn't this mess up the taste in
the smaller glasses?!?." The answer is that it depends on the nature
of the leakage light. If, as is typical, the leakage light resembles the
light from the bulb, it may actually be deficient in red, and in this
case, the exact CC filter that corrects for the limiting factor of the
bulb will actually correct the color balance of the leakage light as well!
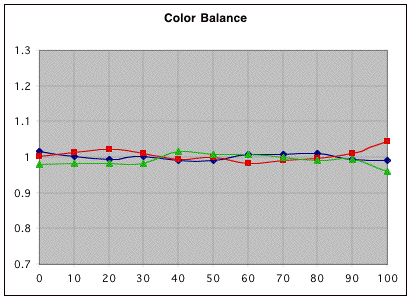
In the graph above, a CC 30R filter was used to correct the leakage light of the PLV-70 measured above, and you can see the color balance at the low IRE levels is dramatically improved.
The other thing worth noting is that we have changed the flavor of the
White Russian our projector produces (in the above example, the flavor
produced is now 1:2:2, not 1:1:1)! This means that the output from the
projector without the filter is going to look wrong ! So always leave
the filter ON when using a color temperature designed for use with the
filter.
Over-Correction
However, just like Red, there ARE limits on how much Green and Blue are
produced by the UHP bulb. If, in trying to use a CC filter you choose
one that filters too much green or blue or both, then the Blue or Green
limits are reached, and we begin to lose brightness with the filter on
(But not contrast – the blacks get darker at the same rate the whites
do.)
In the original example, Red determined the “Greatest Equal Part.”
However, in over-correction this changes. Say that in the above example
our projector produces a maximum of 100 parts of red, 200 parts of green
and 175 parts of blue. When using our 50% filter, we MUST have 200 parts
of blue to maintain a D65 flavor (temp) and the same brightness on the
other side of the filter. However, since we can’t get 200 parts
of blue, just 175, Blue has just determined the “New Greatest Equal
Part”.
On the projector the proper recipe is 1 : 2: 2 of red, green and blue.
So if we need twice as much blue as red, and our maximum is 175 parts,
then red must be set at 87.5 and Green set at 175.
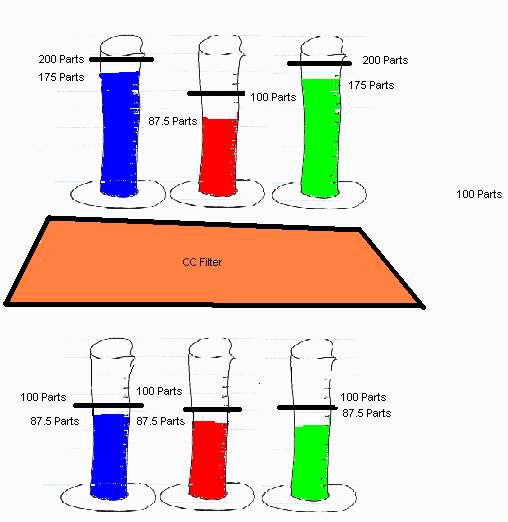
As you can see, the overall size of the “biggest” white Russian
is now smaller. (Red, Green and Blue are all set lower than when 100 parts
of Red was used as the “Greatest Equal Part”). Over correction
is therefore very similar to adding a slight Neutral Density filter to
you projector as well as a CC filter, as the light intensity of all three
colors is somewhat diminished.
Luckily, the blacks also got blacker by the same amount. This is called
over-correction.
It does NOT Lower contrast, and it’s a matter of personal preference
if you want to over-correct or not. Generally you over correct if darker
blacks are more important to you than overall image brightness.
Closing Remarks
Hopefully this little drink-mixing lesson was helpful in understanding
your projector and the SMART process. However, some generalizations were
made, so here are a few parting remarks:
The Proper recipe for D65 is NOT 1 part red, 1 part blue and 1 part green.
By normalizing the whole mess to 1:1:1, it
A) makes the whole thing a LOT easier to understand
B) Doesn’t change the results.
If you still didn’t understand a word of the above discussion, don’t worry. The rest of this documentation will tell you just what to do and when to do it, and you don’t really have to know why you are doing it.
Good luck and Bottoms Up!
Introduction to how SMART works
Frequently Asked Questions about SMART
Here is what's new is SMART III version 1.2
The Dummies Guide explains the SMART process in a non-technical way
Buy SMART III at EnhancedHT - your exclusive source for all SMART products
Having trouble? Learn the most common mistakes people make using SMART
Read about using bias lights to improve perceived black levels.
Here are some additional tips for the SONY projectors and solution to common problems.